| Now that you have your azimuth and
elevation coordinates, what do you do with them?
 First,
survey the site to ensure an unobstructed view in the direction of the
satellite. To receive DBS broadcast signals, your DBS dish needs to be
positioned correctly. Mount your DBS dish so that the base fits flush with
the mounting surface (level if mounted on a flat beam or roof, or on an
angle to match the pitch of your roofline). When you have securely mounted
your DBS dish, adjust your dish so that the dish mast is plumb, that is,
exactly perpendicular to level - this is best achieved using a carpenter's
level. With your dish now mounted and properly set, you are now ready to
aim your dish toward the satellites. First,
survey the site to ensure an unobstructed view in the direction of the
satellite. To receive DBS broadcast signals, your DBS dish needs to be
positioned correctly. Mount your DBS dish so that the base fits flush with
the mounting surface (level if mounted on a flat beam or roof, or on an
angle to match the pitch of your roofline). When you have securely mounted
your DBS dish, adjust your dish so that the dish mast is plumb, that is,
exactly perpendicular to level - this is best achieved using a carpenter's
level. With your dish now mounted and properly set, you are now ready to
aim your dish toward the satellites.
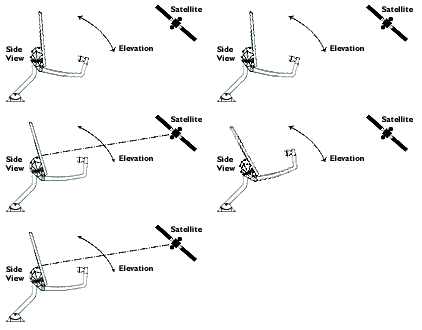
To set the dish to point up to the satellites,
you’ll first need to set the elevation. Then you’ll point the dish in the
proper left-to-right position, to set the azimuth. You’ll need to refer to
the installation manual for your DBS system for detailed instructions, but
here’s the short course.
 1. Select a flat and secure site to install the antenna base
plate. 1. Select a flat and secure site to install the antenna base
plate.
2. Place the base
plate so the outside holes are positioned over the brick surfaces. Do not
drill into the mortar between the bricks.
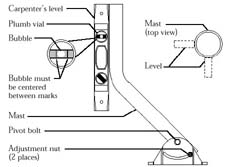
3. Using a carpenters
level, plumb the antenna mast in at least two different locations on the
side of the mast, as shown in diagram at right. These two measurements
should be at right angles to each other. If the mast is plumb (aligned
vertically with the bubble level), go to step 5. Otherwise, loosen the
adjustment nuts.
4. Rotate the mast
until it is plumb with the level, then use the torque wrench to tighten
the adjustment nuts to 15 ft-lbs. If you are still unable to align the
mast with the level, try using wooden shims. If they do not correct the
problem, you will need to find another site to install the
antenna.
Be sure to follow the safety precautions and
warnings contained in the installation and operation manuals for your DBS
system.
- Make sure where ever you mount the mast (see illustrations
below) that it's plumb with the ground.

- Realize that from the dish to the receiver your wire must
not have any splitters in the way. It should be one solid
line unless you're putting a grounding block on the side of your
house.
- A clear line of sight is a must. These are reflective dishes,
so it's easier to get over objects than under, for example, tree
leaves. Once setup is complete and you are ready to find the
Satellite, follow these easy steps.
a. Pull up the signal meter screen through the main
menu on your receiver. You'll need this to find the setting for
the dish and to see when you hit the Satellite.
b. Begin by pointing your dish south. 
c. Setting the Elevation
(UP), (DOWN)
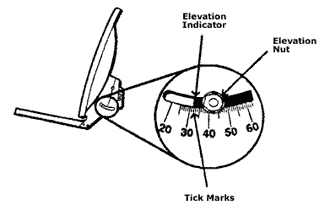
You can set the proper elevation after the
dish is securely mounted. First, loosen the nuts securing the two
elevation bolts so that the dish easily moves up and down. Line up
the elevation indicator with the tick mark corresponding to your
elevation number. Then tighten the bolts. Be sure to
stop 5 to 10 seconds between each movement so that the receiver
has time to catch the signal.
 d. If you hit any number besides 0 on the signal
meter screen of the TV, you are on the Satellite and you just need
to fine tune the signal with small movements up and down, left and
right, or both. If you fail to find the Satellite on the first
pass, move the setting on the dish up to a four-point variance on
the settings. Example: If it said 42 on the zip code screen, you
could go from 40-44 on the settings d. If you hit any number besides 0 on the signal
meter screen of the TV, you are on the Satellite and you just need
to fine tune the signal with small movements up and down, left and
right, or both. If you fail to find the Satellite on the first
pass, move the setting on the dish up to a four-point variance on
the settings. Example: If it said 42 on the zip code screen, you
could go from 40-44 on the settings
.
 e. Setting
the Azimuth (LEFT), (RIGHT) e. Setting
the Azimuth (LEFT), (RIGHT)
Loosen the azimuth nuts on the
LNB arm enough that the dish can be turned smoothly with little
pressure. Set the azimuth by moving the dish left and right. Point
the dish in the general direction of the satellite, in the
southern hemisphere. By using a compass you can better pinpoint
the direction with your azimuth number to correspond with the
degrees on your compass. Now that you have moved the dish
down or up a mark, go back from 2 O'clock to 1 O'clock moving
again only 1/4 movements and stopping in between moves.
f. Repeat steps C, E, and F until you find the
Satellite.
- You must be above 50 on the signal meter to acquire steady
programming.
- Acquiring the Signal
Now
your dish will be in position to lock in on the satellite signal.
You’ll need to 1) have your DBS receiver connected to your
television, with both turned on, and 2) have your antenna to
receiver cables connected, and 3) be viewing your Setup
Antenna/Signal Strength display from your DBS on-screen menu to
measure the signal strength accurately. (The DSS system manual
tells you how to find this display.)
Ask a helper to watch the
Signal Strength screen for indications you are receiving the
signal. Stand behind the dish, and holding its outer edges,
slowly turn it a little to the right to adjust the azimuth.
Pause a few seconds, giving the receiver enough time to lock in on
the satellite signal. Continue turning the dish in this way until
you have acquired the signal or until you have rotated the dish
approximately 15 degrees from the starting point.
If you haven’t detected a
signal yet, return to the starting point and move the dish to the
left again. If you don’t acquire the signal after rotating the
dish approximately 15 degrees to either side of the calculated
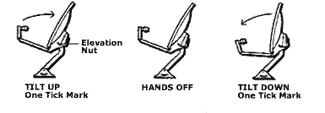
azimuth angle, loosen the elevation bolts and tilt the dish upward
so the elevation indicator moves halfway from the current tick
mark to the next mark. Then tighten the elevation
bolts.
If necessary, continue
changing the elevation in half-tick-mark increments until you
receive the signal. After tilting the dish upwards three tick
marks beyond the original tick mark, return it to the original
tick mark and then tilt it down a half tick mark. Keep repeating
this until you receive the signal.
You will never see 100, but high 70's to low 80's
will give you enough variance for wind, snow and rain fade.
Fine Tuning
Now
that you have received the satellite signal, it is important to
fine tune the dish pointing to make sure you have the maximum
possible signal strength. Maximizing the signal is important, in
that, it reduces "rain fade" during inclement weather. Loosen the
elevation bolts, then gently continue turning the dish a little in
the same direction you were turning it when you began to receive
the satellite signal. Pause for a few seconds each time after
moving the dish. Turn the dish in this way until the signal
strength reaches its highest reading and then begins to fall. Then
slowly turn the dish the opposite way until you again receive the
highest reading on the Signal Strength screen. Important: The
Signal Strength reading does not need to be "100." Lock in on the
highest possible signal. Tighten the azimuth bolts.
Loosen the elevation bolts.
Slowly tilt the dish up and down to improve the Signal Strength
reading. When you are satisfied that you have the strongest
signal, tighten the elevation bolts.
- Lock down the system once the highest signal has been obtained
and call in your programming with Pending Account number.
|
Make A Custom Dish
Congratulations!
You did it! |
![]()

