- Measuring speaker parameters
-
- The following will lead you
through the test procedure needed to find some of
the T/S parameters of your speaker.
-
You'll need: a 4-8 ohm resistor rated at 5 watts
or higher An amplifier which has a flat frequency
response from 20-100hz A sine wave generator with
frequency counter or an external frequency
counter. A test enclosure with a known internal
volume A digital multi-meter. A true RMS meter
will be the most accurate. Disregard the readings
on the test equipment in the diagram. They ain't
right!
- Set your meter to ohms and
measure the DC resistance of the speaker and the
resistor. Enter these values in fields '1' and
'2'.
-
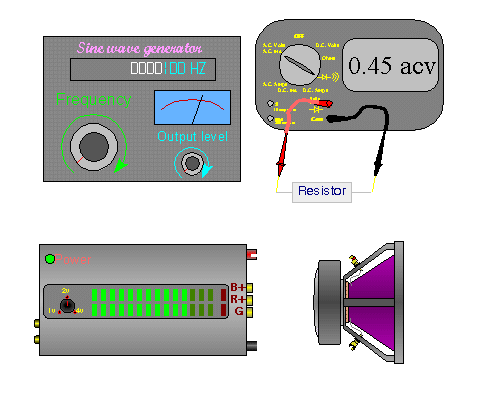
- Make the connections as shown
below and set the generator's frequency to
somewhere between 40 and 100 hz. Set the
generator's output so that the amplifier produces
approximately 3 volts AC. Enter the exact output
voltage in field '3'. Do not change the output
level for the rest of the testing. To mute the
audio, turn the amplifier off.

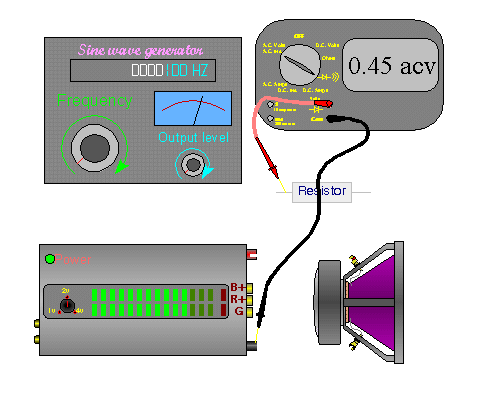
- Now make the connections as
shown below. Adjust the frequency of the generator until you get the
lowest possible voltage reading across the
resistor. This is the resonant frequency of the
speaker. The reason that the voltage is lowest at
this point is because the impedance of the
speaker is at its highest. When the speaker's
impedance increases, the current flow decreases.
Since there is less current flowing through the
resistor, there is a smaller voltage drop across
the resistor. Enter the minimum obtainable
voltage into field 5 below. Enter the frequency
where the minimum voltage was obtained into field
4. Click on 'calculate'. Don't be concerned by
the erroneous values in some of the fields. We're
only half way through the test.

-
- Adjust the frequency of the generator down until the
voltage across the resistor is the same as the
field marked 'Resistor's 3dB Down Voltage'. Enter
the frequency into field 7. Now go up in
frequency past the resonant frequency to the
point where the voltage is again the same as
'Resistor's 3dB Down Voltage'. Enter this value
into field 6.
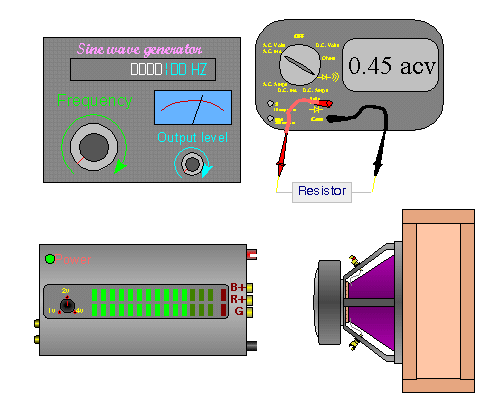
- Measure and enter the internal
volume of the enclosure into field 9. Mount the
speaker in or on the enclosure. If you mount it
'in' the enclosure, subtract the appropriate
amount from the enclosure's volume (see table
below). Find the resonant frequency of the
speaker in the enclosure by finding the frequency
where the voltage across the resistor is lowest.
Enter this value into field 8. Click on
'calculate' again. If the speaker's calculated
resonant frequency is significantly different
from the value that you measured earlier, you may
not have been careful enough in your measurments.
The values output by this calculator should be
very close to the published specifications for
the driver.

| 8
inch |
.03 ft3
|
| 10
inch |
.05 ft3
|
| 12
inch |
.07 ft3
|
| 15
inch |
.10 ft3
|
- Notes:
- There are several things that will
change some of the parameters of the speaker.
None of the following will make a huge difference
in the resonant frequency (except, maybe, #1) but
they will make a difference. If you can not get
consistent measurements, some of the following
may be the cause.
- Physical relationship to
objects around the speaker.
When measuring the resonant frequency of
a speaker, you must make sure that
nothing is reacting with the speaker
except free air. Most people hang the
speaker from a string when finding the
resonant frequency. The speaker should
not be hanging near any other objects. If
it's hanging within ~12" from any
object, the object may affect the
measured resonant frequency. You can
confirm that this is true by placing your
hand in front of the speaker when reading
the voltage across the resistor. Moving
your hand closer to the speaker will
change the voltage reading across the
resistor. If you measure the resonant
frequency with the speaker laying on its
magnet, you'll get slightly skewed
readings. If the magnet has a vented pole
piece, the readings will be even more
skewed. For an 8" woofer that I was
testing, the difference between the free
air resonance and resonance with the
speaker within 1" of a wall, was
about 2.5%. This isn't a big difference
but I'm mentioning it so that you'll
realize that little things can cause
variations in your measurements.
- Temperature:
Most speaker components are, at least,
somewhat sensitive to temperature. This
is especially true for the spider and the
surround. At very low temperatures, they
will be less compliant (which will give a
higher resonant frequency). At higher
temperatures, the spider and surround
will be more compliant and will produce a
lower resonant frequency. For critical
measurements, you should measure the
resonant frequency at the same
temperature as the environment where the
speaker will be used. For home speakers,
this is easy. For car speakers, the wide
temperature variations make it more
difficult to pick a temperature at which
to test.
- Humidity:
Some speakers (especially those with
untreated paper cones) will absorb
moisture and will therefore have a
slightly different resonant frequency
when the air is very humid or very dry.
- 'Breaking in' the
Speakers:
'Some' speakers need to be played a while
before they obtain a stable compliance.
Fresh out of the box, the suspension may
be somewhat stiff (mainly due to the
material that's used for the spider).
After playing them a while, the
suspension will soften a little. If you
want to break them in, play them at a
very low frequency (preferably at
resonance) for 10 minutes or so. Drive
them with enough power to move the cones
about 2/3 of Xmax. With the speakers
hanging in free air and at resonance,
there will be virtually no chance of
injuring the speakers. Remember, at
resonance, the speaker moves
significantly with very little power
applied. The combination of very high
impedance and significant cone movement
virtually eliminates any chance of
overheating the voice coil. This should
not be done with the speakers in an
enclosure, lying face down or on their
magnets (especially if they have a vented
pole piece).
- Test Equipment:
Professional quality test equipment won't
be affected much by temperature. That
said, it's best if you allow the test
equipment to reach 'room temperature' if
you want reliable measurements. If your
meter was in the trunk of your car baking
in the hot sun and you make the
measurements as soon as you bring it in
to the test area, you may get
significantly different readings than you
will when the meter cools down. The same
goes for the signal generator/frequency
counter.
- Meter Frequency Response:
Before you get started, you should
connect your meter directly across the
signal generator and check to see that
the voltage doesn't vary as you sweep the
frequency from ~20hz to ~100hz. If the
voltage starts to drop near 20 hz, you
may want to find a true RMS meter to do
the tests.
- For the most accurate
measurements, I would hang the speaker in the
middle of a room in your home (or temperature
controlled shop). This will provide a stable,
consistent environment for your tests. Allow all
test equipment and speakers to reach room
temperature before testing. To get consistent
measurements, you need to have consistent test
conditions.
- As a side note, Someone once told
me that hanging the speaker can cause the
measured resonant frequency to be off because the
magnet/frame structure moves a little. They said
that the speaker had to be mounted securely into
an infinite baffle to give accurate measurements.
I can not deny or confirm this statement.
|