![]()
Please 'Boom' Responsibly As most of you have noticed, the noise ordinances have become much tougher lately. Most of this is due to idiots, yes IDIOTS, who drive through residential areas with their windows down while their system is playing at full power. To make things worse, the music they listen to has all sorts of foul language that's not suitable for small children, (who may be playing outside). There are even a few people, who are even beyond idiot status, that play their systems at full power through residential areas after 10:00 PM (when many people go to bed). I don't believe that this type of behavior is good for the industry. If the fines get too stiff, people will stop buying large systems. If this happens, more people will get out of car audio (who wants a mediocre system). People get interested in things because they're exciting. A deck and four 6.5" speakers are not going to interest many of the younger car audio enthusiasts. If car audio enthusiasts keep annoying more and more people, the fines will keep getting tougher. All of this will only reduce interest in the equipment that fuels the industry. If you want to listen to your system at full volume, get out on the highway where there's little chance of bothering anyone. When you get to a red light, turn it down. If the only thing attractive about you is your 'system', you have some work to do. Bottom line... Think about what you're doing. Think about other people. It's not the end of the world if you have to turn the volume down for a little while. |
|
Slightly More In-Depth Information
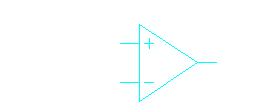
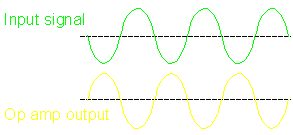
Op Amps as Comparators: An op amp can be used to compare 2 different voltages. If you apply a reference voltage to one of the inputs and then use the other input to monitor a voltage from some point in a circuit, the output of the op amp will go from high to low (or vice-versa) as the monitored voltage crosses the reference voltage.
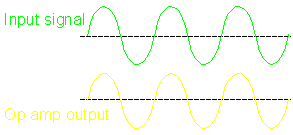
As you can see in the following demo, The yellow line shows the voltage on the negative input. The voltage follows a curve because the capacitor is charging. The capacitor charges faster at first then it slows as it approaches full charge. The blue line indicates the voltage on the positive input. Since the 2 voltage divider resistors are of equal value, the voltage on the positive input is exactly half of the power supply voltage. You can also see that the voltage on the output of the op amp is high (close to the power supply voltage). If you push the button, the capacitor will start to charge. The little lines in the window are voltage indicators. Think of them as a portion of the trace on an oscilloscope. As the capacitor charges (and the voltage starts to rise), the line goes up (it follows the voltage). As you can see, the voltage on the output does not change until the voltage on the negative input is higher than the voltage on the positive input. Remember that the previous circuits had a feedback signal return path between the output of the op amp to the negative input. Since there is no feedback, the gain is essentially (ideally) infinite. This will make the output swing from its maximum positive output voltage to its maximum negative output voltage. If there were a feedback resistor, the output voltage would not swing as far. With a feedback resistor, you could get the op amp's output voltage to be an inverted version of the voltage on the negative input. Remember that the circuit is a comparator. It's comparing the voltage on the 2 inputs. When the voltage on the negative input is below the reference voltage (on the positive input), the output is high. As soon as the voltage on the negative input goes above the voltage on the positive input, the output goes low. If you look at the white line sweeping from left to right you can see that the green line instantly transitions from high to low at the point where the blue and yellow lines intersect.
Note: This is the same basic principle that the fan controller on the cooling fans page employs. The fan controller uses the negative input for the reference and the positive input (who's voltage is controlled by the thermistor) as the input to the comparator.
Maximum and Minimum Input/Output Values: Some op amps can not accept inputs that equal the power supply voltage (or ground in the case of a single ended† supply). If the input is beyond the safe input values, the input may lead to unexpected output values. For instance, if the negative input in the previous circuit were grounded, some op amps would erroneously give a low output instead of a high output. As soon as the input voltage moved slightly above ground, the op amp would again operate as you'd expect. If you need an op amp to accept inputs close to ground, you need to get an op amp suited for the task. The op amp on the cooling fans page is such a device. It's an LM358 which can be found on the TI site.
†A single ended supply is one that uses only ground and EITHER a positive OR negative voltage. A 'split' supply has a positive voltage AND a negative voltage (below ground). If you see a power supply described as a 12 volt supply, it likely means that it is simply a single ended supply. If the supply voltage is expressed as ±15 volts, it's a split supply. In audio, split supplies are most common. For digital equipment, the comparators would likely be powered by a single ended 5 volt supply.
Op Amps as Regulators: If you need a high quality linear regulator, an op amp can save a lot of effort. In the following demo, you can see that there is a simple zener shunt regulator connected to the positive input of the op amp. This becomes the reference voltage. If the zener is a 6.2 volt device, the reference will be 6.2 volts. Actually the reference voltage will likely be a little more or less than 6.2 volts (due to tolerances and the actual current flowing through the diode). If the voltage is precisely 6.2 volts on the positive input, the output of the regulator (the emitter of the current boost NPN bipolar transistor) will be precisely 6.2 volts. The feedback line from the emitter to the negative input of the op amp allows the op amp to monitor the output and compensate for changing load current. If the load resistor decreases in resistance, the output current increases (because we have a regulated voltage source). Without the feedback, the output from the regulator would likely drop a little. In most cases that would be fine. In some circuits, however, the change in voltage would be unacceptable.
When you push the button in the following demo, the resistance will decrease. You will notice that the regulator output current through the resistor increases in proportion to the fall in resistance. You will also notice that the output voltage is rock solid. If you look carefully, you can see that the output voltage from the op amp increases slightly to increase the current through the base of the transistor (which is needed to maintain the proper output voltage).
This next section will examine the current flow in the regulator components. In the following diagram, the first thing we set up is the zener shunt regulator. We must select a resistor that will allow enough current to flow through the zener to allow it to operate but the resistor must also limit the current flow through the zener. If too much current flows through the zener, the power dissipation will be too great and it will cause the zener to fail. Since the op amp will not have any appreciable current flow into its positive input, there will be (essentially) no branch current to worry about. The resistor can be chosen solely on the desired current flow through the zener. If we use a diode like a 1N5234 1/2 watt zener diode, we know that it has a breakdown voltage of 6.2 volts and a maximum continuous power dissipation of 1/2 watt. If we use Ohm's Law, we can calculate the maximum allowable current with the following formula:
P = IE or I=P/E I = 0.5/6.2 I = 0.080 amps (Maximum allowable current)
Since we don't want to use the diode at its limit, we will chose a value of half of the maximum allowable current flow. This means that we want 40 milliamps of current. To calculate the value of the resistor, we need to know the voltage across the resistor. If we're using a supply voltage of 12 volts and have a zener voltage of 6.2 volts, we know that the voltage across the resistor will be 12 minus 6.2 or 5.8 volts. We can again use Ohm's Law for the calculations.
V = IR or R=V/I (This is designated as Rzener in the following drawing) R = 5.8/0.040 R = 145 ohms (150 ohms would be close enough)
Now that we have the zener properly biased, we can look at the rest of the regulator. On the bipolar transistor page we mentioned the transistor's 'beta'. It tells you the DC current gain of the transistor. For this example, let's use a 2N3055 transistor. It is very commonly found in regulated power supplies. This transistor's beta is given as 40-70. For the calculations, we'll use the median value of 55. This means that for every 1 amp of emitter current, we will need 1/55 of an amp of current from the op amp's output. In this regulator, the maximum output current of the op amp will be the limiting factor. Most op amps can not be relied on to deliver more than about 15ma of current. For this example, let's say that we have a load resistance of 10 ohms. If the regulated voltage is 6.2 volts and the load is 10 amps:
I = V/R I = 6.2/10 I = .62 amps
This means that the current through the transistor and Rload is 0.62 amps. If the transistor has a beta of 55, the current flow through the transistor's base and Rbase will be 0.62/55 or 11ma. If Rbase is 100 ohms and the current flow through it is 11ma, the voltage drop would be 1.1 volts. If you remember that the transistor has a 0.7 volt drop from the base to the emitter, you can calculate the voltage that the op amp will have to produce at its output.
Vop amp = Vout+Vbe+VRbase Vop amp = 6.2+0.7+1.1 Vop amp = 8 volts
In the previous audio applications, we discussed op amps as amplifiers where EITHER the positive OR negative inputs were driven. For applications such as balanced receivers (the other end of a balanced line driver) and the balanced inputs of amplifiers, something similar to the diagram above is used. In this circuit (an op amp with the inputs configured as a differential amplifier), if all of the resistances are equal AND the same voltage is driven into each of the inputs, the output will be ZERO (no output, no matter how large the signal (within the SOA of the op amp)). This circuit amplifies the difference in the 2 input signals. This is why radiated noise that's picked up by BOTH conductors of the audio signal cable is cancelled out. For a balanced audio signal, both conductors of the audio cable have audio on them but they are 180° out of phase, they're not cancelled out (entering a negative voltage on one input and the same magnitude positive voltage on the other input, you'll see you'll see that the output is twice the individual input voltages). If you enter 3 and negative 3, the output will be 6 (the difference between 3 and -3). This circuit will also work with unbalanced signals. If you enter 3 volts on one of the inputs and 0 volts on the other input, you'll see that the output is equal to the input voltage. If 0 volts is entered on the positive input and 3 volts on the negative input, you'll see that the output is -3 volts which means that it's an inverted version of the input voltage. As long as (Rf*R-in) = (Rs*R+in), the op amp will perform as described above. If those conditions are not met, the op amp won't cancel out unwanted signals.
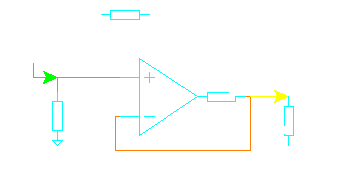
Bridging Module: This circuit was designed to invert an audio signal. Most car audio amplifiers have one 'normal' channel and one 'inverted' channel. The inverted channel is needed so the amplifier can be bridged. Some of the older Orion amplifiers did not have an inverted channel and therefore needed a 'bridging module' to bridge the amplifier. To use this circuit, you would connect the left signal directly to the amplifier and the right channel to the input of this circuit. The output of this circuit would be connected to the right channel of the amplifier. You would then use the 2 positive speaker output wires for bridging. The left channel will be the positive output. This circuit will probably need to be powered by a constant source to prevent a turn on pop. If you don't want to connect it to a constant power source, connect it to a source that's controlled by the ignition switch. Do not connect it to the remote out of the radio. You can zoom in on the circuit (right click) if you need to see it more closely. Click HERE to have it fill this window.
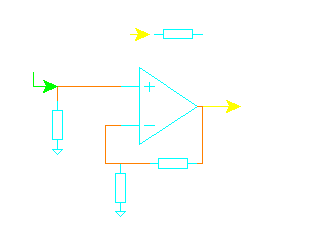
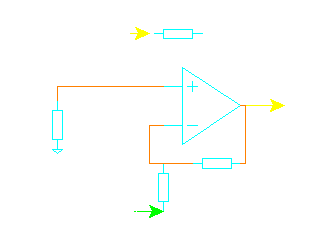
Sub-circuits: R1 and the 10 volt zener diode form a simple voltage regulator. C1 helps to further stabilize the regulated voltage. R2 and R3 form a voltage divider which is used to 'bias' the op-amp. The output will essentially follow the voltage which is applied to the positive input of the op-amp. You already know that an audio waveform must swing both above and below a reference. In equipment with switching power supplies, there are both positive (above the reference) and negative (below the reference) voltages. Since we don't have a switching power supply here, we have to bias the op-amp in the middle of the regulated power supply voltage. This is done with 2 equal value resistors. The voltage at the point where the resistors connect to each other will be at 5 volts (with reference to ground) in this circuit. C4 will filter out any small noise that may be present on the divider and may be omitted. C2 is used to block the DC voltage present on the negative input of the opamp. There is a DC voltage present because the op-amp is biased to 5 volts. If you're using polarized capacitors, the capacitor's positive terminal would go towards the op-amp. R4 and R5 set the gain for the op-amp. In this circuit they are of equal value and the gain is set to 1 (no gain). They will also set the input impedance of the circuit. The input impedance is equal to the value of the resistor used. R6 is included to offer some protection for the op-amp in case it is shorted to ground. It is not necessary with all op-amps (some can survive being shorted to ground) but I feel better with the design when I use it. C3 isolates the DC from the output. You could also use a 100,000 ohm pull down resistor on the output side of the capacitor to drain off any residual DC from the output signal. The positive terminal of a polarized capacitor would go towards the op-amp.
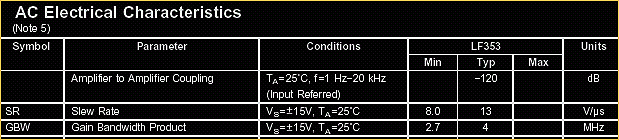
Possible supplier: Radio Shack
Parts list:
Resistors:
R1: 100 ohms RS # 271-1108
R4, R5: 10,000 ohms RS # 271-1335
R2, R3 100k ohms RS# 271-1347
R6: 100 ohms RS # 271-1311
Capacitors:
C2, C3: 22 microfarad (non polarized preferred)
C1: 100 microfarad
C4: 1 microfarad
Op-amp: LF353CN recommended (equal to the generic LM1458)
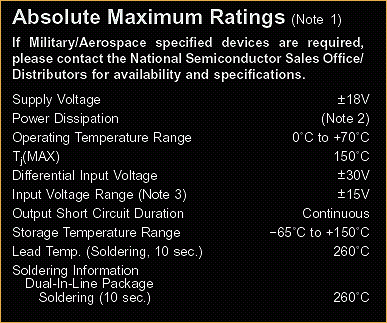
Datasheet Information: The following information is given on the datasheet provided by the manufacturer. In this case it's for the National Semiconductor LF353. It's a high quality dual op amp suitable for high quality audio reproduction. For the following table, the absolute maximum values are given. Most are self explanatory but I'll add my $0.02.
|
 |
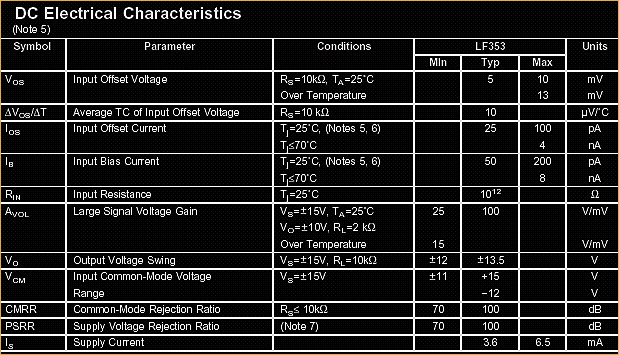
DC Characteristics:
AC Characteristics:
| If you find a problem
with this page or feel that some part of it needs
clarification, E-mail
me. This is a link to this site's home page. |